EFT – Complete Step By Step
EFT – Step 1 The Setup
Applying The First Step is something like going bowling. In bowling, there is a machine that sets up the pins by picking them up and arranging them in perfect order at the end of the alley. Once this “setup” is done, all you need to do is roll the ball down the alley to knock over the pins.
Your energy system, of course, is not really a set of bowling pins. It is a set of subtle electric circuits. I present this bowling analogy only to give you a sense for the purpose of The Setup and the need to… make sure your energy system is properly oriented before attempting to remove its disruptions.
Your energy system is subject to a form of electrical interference which can block the balancing effect of these tapping procedures.
When present, this interfering blockage must be removed or The Basic Recipe will not work. Removing it is the job of The Setup. Technically speaking, this interfering blockage takes the form of a polarity reversal within your energy system. This is not the same thing as the energy disruptions which cause your negative emotions.
Another analogy may help us here. Consider a typical hand held electronic device such as a tape recorder. Like all such devices, it needs batteries to work and, equally important, the batteries must be installed properly . You’ve noticed, I’m sure, that batteries have + and – marks on them. Those marks indicate their polarity . If you line up those + and – marks according to the instructions, then the electricity flows normally and your tape recorder works fine.
But what happens if you put the batteries in backwards? Try it sometime. The tape recorder will not work. It acts as if the batteries have been removed. That’s what happens when polarity reversal is present in your energy system. It’s like your batteries are in backwards. I don’t mean you stop working altogether….like turn “toes up” and die….but your progress does become arrested in some areas.
This polarity reversal has an official name. It is called Psychological Reversal and represents a fascinating discovery with wide ranging applications in… all areas of healing and personal performance. It is the reason why some diseases are chronic and respond very poorly to conventional treatments. It is also the reason why some people have such a difficult time losing weight or giving up addictive substances. It is, quite literally, the cause of self sabotage. An entire course could be dedicated to its uses and it is covered in detail in Part II of this course.
For now, however, we need only know some foundational things about Psychological Reversal that apply to EFT and…more importantly…how to correct it.
Psychological Reversal is caused by self defeating, negative thinking which often occurs subconsciously and thus outside of your awareness. On average, it will be present…and thus hinder EFT…about 40% of the time. Some people have very little of it (this is rare) while others are beset by it most of the time (this also is rare). Most people fall somewhere in between these two extremes. It doesn’t create any feelings within you so you won’t know if it is present or not. Even the most positive people are subject to it….including yours truly.
When it is present it will stop any attempt at healing, including EFT, dead in its tracks.
Therefore… It must be corrected if the rest of The Basic Recipe is going to work. Being true to the 100% overhaul concept we correct for Psychological Reversal even though it might not be present . It only takes 8 or 10 seconds to do and, if it isn’t present, no harm is done. If it is present, however, a major impediment to your success will be out of the way.
That being said, here’s how The Setup works. There are two parts to it…
1. You repeat an affirmation 3 times while you…
2. Rub the “Sore Spot” or, alternatively, tap the “Karate Chop” point (these will be explained shortly).
The Affirmation
Since the cause of Psychological Reversal involves negative thinking it should be no surprise that the correction for it includes a neutralizing affirmation. Such is the case and here it is.
Even though I have this _____________, I deeply and completely accept myself.
The blank is filled in with a brief description of the problem you want to address. Here are some examples.
**Even though I have this fear of public speaking, I deeply and completely accept myself.
**Even though I have this headache, I deeply and completely accept myself.
**Even though I have this anger towards my father, I deeply and completely accept myself.
**Even though I have this war memory, I deeply and completely accept myself.
**Even though I have this stiffness in my neck, I deeply and completely accept myself.
**Even though I have these nightmares, I deeply and completely accept myself.
**Even though I have this craving for alcohol, I deeply and completely accept myself.
**Even though I have this fear of snakes, I deeply and completely accept myself.
**Even though I have this depression, I deeply and completely accept myself.
This is only a partial list, of course, because the possible issues that are addressable by EFT are endless. You may hear us use affirmations on DVDs like…
**”I accept myself even though I have this_________.” or **”Even though I have this ____________, I deeply and profoundly accept myself.” or **”I love and accept myself even though I have this_______________.”
All of these affirmations are correct because they follow the same general format. That is….they acknowledge the problem and create self acceptance despite the existence of the problem. That is what’s necessary for the affirmation to be effective. You can use any of them but I suggest you use the recommended one because it is easily memorizable and has a good track record at getting the job done.
Now here are some interesting points about the affirmation… **It doesn’t matter whether you believe the affirmation or not….just say it.
**It is better to say it with feeling and emphasis but saying it routinely will usually do the job. **It is best to say it out loud but if you are in a social situation where you prefer to mutter it under your breath….or do it silently….then go ahead. It will probably be effective. To add to the effectiveness of the affirmation, The Setup also includes the simultaneous rubbing of a “Sore Spot”….or….tapping on the “Karate Chop” point. They are described next.
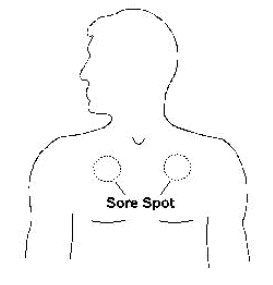

The Sore Spot
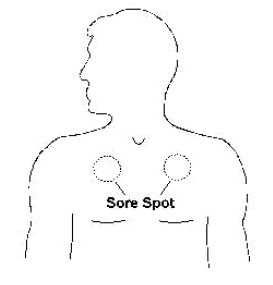
There are two Sore Spots and it doesn’t matter which one you use. They are located in the upper left and right portions of the chest and you find them as follows:
Go to the base of the throat about where a man would knot his tie. Poke around in this area and you will find a U shaped notch at the top of your sternum (breastbone). From the top of that notch go down 3 inches toward your navel and over 3 inches to your left (or right). You should now be in the upper left (or right) portion of your chest. If you press vigorously in that area (within a 2 inch radius) you will find a “Sore Spot.” This is the place you will need to rub while saying the affirmation.
This spot is sore when you rub it vigorously because lymphatic congestion occurs there. When you rub it, you are dispersing that congestion. Fortunately, after a few episodes the congestion is all dispersed and the soreness goes away. Then you can rub it with no discomfort whatsoever.
I don’t mean to overplay the soreness you may feel. It’s not like you will have massive, intense pain by rubbing this Sore Spot. It is certainly bearable and should cause no undue discomfort. If it does, then lighten up your pressure a little. Also, if you’ve had some kind of operation in that area of the chest or if there’s any medical reason whatsoever why you shouldn’t be probing around in that specific area then switch to the other side. Both sides are equally effective. In any case, if there is any doubt, consult your health practitioner before proceeding….or….tap the “Karate Chop” point instead.


The Karate Chop Point
The Karate Chop point (abbreviated KC ) is located at the center of the fleshy part of the outside of your hand (either hand) between the top of the wrist and the base of the baby finger or….stated differently….the part of your hand you would use to deliver a karate chop.
Instead of rubbing it as you would the Sore Spot, you vigorously tap the Karate Chop point with the fingertips of the index finger and middle finger of the other hand. While you could use the Karate Chop point of either hand, it is usually most convenient to tap the Karate Chop point of the nondominant hand with the two fingertips of the dominant hand. If you are right handed, for example, you would tap the Karate Chop point on the left hand with the fingertips of the right hand.
Should you use the Sore Spot or the Karate
Chop point? After years of experience with both methods, it has been determined that rubbing the Sore Spot is a bit more effective than tapping the Karate Chop point. It doesn’t have a commanding lead by any means but it is preferred.
Because The Setup is so important in clearing the way for the rest of The Basic Recipe to work, I urge you to use the Sore Spot rather than the Karate Chop point. It puts the odds a little more in your favor. However, the Karate Chop point is perfectly useful and will clear out any interfering blockage in the vast majority of cases. So feel free to use it if the Sore Spot is inappropriate for any reason.
You will notice on the videos that I often instruct people to tap the Karate Chop point instead of rub the Sore Spot. That’s because it is easier to teach when I’m on stage.
Stepping Through It
Now that you understand the parts to The Setup, performing it is easy. You create a word or short phrase to fill in the blank in the affirmation and then… simply repeat the affirmation, with emphasis, 3 times while continuously rubbing the Sore Spot or tapping the Karate Chop point.
That’s it. After a few practice rounds, you should be able to perform The Setup in 8 seconds or so. Now, with The Setup properly performed, you are ready for the next ingredient in The Basic Recipe….The Sequence.
EFT – Step 2 The Sequence
The Sequence is very simple in concept. It involves tapping on the end points of the major energy meridians in the body and is the method by which the “zzzzzt” in the energy system is balanced out. Before locating these points for you, however, you need a few tips on how to carry out the tapping process.
Tap with the fingertips of your index finger and middle finger. This covers a little larger area than just tapping with one fingertip and allows you to cover the tapping points more easily. Tap solidly but never so hard as to hurt or bruise yourself.
Tap about 7 times on each of the tapping points. I say about 7 times because you will be repeating a “reminder phrase” (covered later) while tapping and it will be difficult to count at the same time. If you are a little over or a little under 7 (5 to 9, for example) that will be sufficient.
Most of the tapping points exist on either side of the body. It doesn’t matter which side you use nor does it matter if you switch sides during The Sequence. For example, you can tap under your right eye and, later in The Sequence, tap under your left arm.
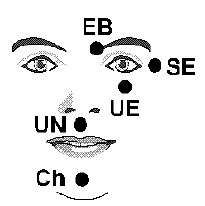

The points: Each energy meridian has two end points. For the purposes of The Basic Recipe, you need only tap on one end to balance out any disruptions that may exist in it. These end points are near the surface of the body and are thus more readily accessed than other points along the meridians that may be more deeply buried. What follows are instructions on how to locate the end points of those meridians that are important to The Basic Recipe. Taken together….and done in the order presented….they form The Sequence.
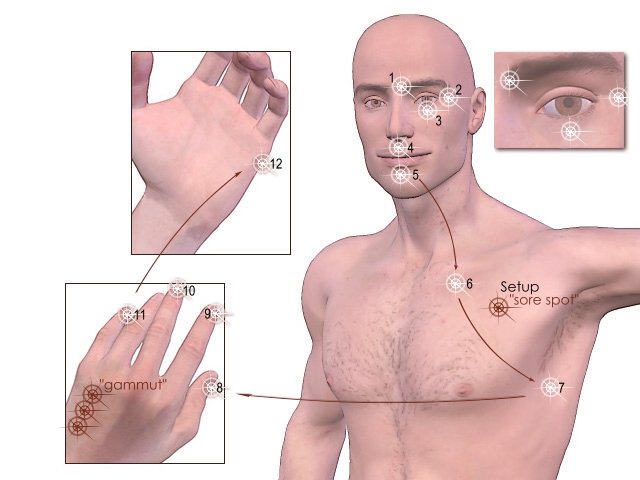
**At the beginning of the eyebrow, just above and to one side of the nose. This point is abbreviated EB for beginning of the E ye B row.
**On the bone bordering the outside corner of the eye. This point is abbreviated SE for S ide of the E ye.
**On the bone under an eye about 1 inch below your pupil. This point is abbreviated UE for U nder the E ye.
**On the small area between the bottom of your nose and the top of your upper lip. This point is abbreviated UN for U nder the N ose.
**Midway between the point of your chin and the bottom of your lower lip. Even though it is not directly on the point of the chin, we call it the chin point because it is descriptive enough for people to understand easily. This point is abbreviated Ch for Ch in.
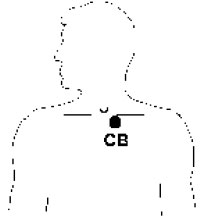

**The junction where the sternum (breastbone), collarbone and the first rib meet. To locate it, first place your forefinger on the U-shaped notch at the top of the breastbone (about where a man would knot his tie). From the bottom of the U, move your forefinger down toward the navel 1 inch and then go to the left (or right) 1 inch .
This point is abbreviated CB for C ollar B one even though it is not on the collarbone (or clavicle) per se. It is at the beginning of the collarbone and we call it the collarbone point because that is a lot easier to say than “the junction where the sternum (breastbone), collarbone and the first rib meet. “
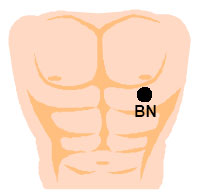

**On the side of the body, at a point even with the nipple (for men) or in the middle of the bra strap (for women). It is about 4
inches below the armpit. This point is abbreviated UA for U nder the A rm.


**For men, one inch below the nipple. For ladies, where the underskin of the breast meets the chest wall. This point is abbreviated BN for B elow N ipple. As discussed below, this point has been added for this edition.
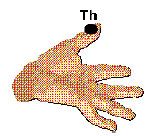

**On the outside edge of your thumb at a point even with the base of the thumbnail. This point is abbreviated Th for Th umb.


**On the side of your index finger (the side facing your thumb) at a point even with the base of the fingernail. This point is abbreviated IF for I ndex F inger.


**On the side of your middle finger (the side closest to your thumb) at a point even with the base of the fingernail. This point is abbreviated MF for M iddle F inger.
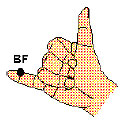

**On the inside of your baby finger (the side closest to your thumb) at a point even with the base of the fingernail. This point is abbreviated BF for B aby F inger.


**The last point is the karate chop point….which has been previously described under the section on The Setup. It is located in the middle of the fleshy part on the outside of the hand between the top of the wrist bone and the base of the baby finger. It is abbreviated KC for K arate C hop.
The abbreviations for these points are summarized below in the same order as given above.
EB = Beginning of the E ye B row
SE = S ide of the E ye
UE = U nder the E ye
UN = U nder the N ose
Ch = Ch in
CB = Beginning of the C ollar B one
UA = U nder the A rm
BN = B elow the N ipple
Th = Th umb
IF = I ndex F inger
MF = M iddle F inger
BF = B aby F inger
KC = K arate C hop
Please notice that these tapping points proceed down the body . That is, each tapping point is below the one before it. That should make it a snap to memorize. A few trips through it and it should be yours forever.
Also note that the BN point has been added since the making of the videos that accompany this course. It was originally left out because it was awkward for ladies to tap while in social situations (restaurants, etc.). Even though the EFT results have been superb without it, I include it now for completeness.
EFT – Step 3 The 9 Gamut Procedure
The 9 Gamut Procedure is, perhaps, the most bizarre looking process within EFT. Its purpose is to “fine tune” the brain and it does so via some eye movements and some humming and counting. Through connecting nerves, certain parts of the brain are stimulated when the eyes are moved. Likewise the right side of the brain (the creative side) is engaged when you hum a song and the left side (the digital side) is engaged when you count.
The 9 Gamut Procedure is a 10 second process wherein 9 of these “brain stimulating” actions are performed while continuously tapping on one of the body’s energy oints…..the Gamut point. It has been found, after years of experience, that this routine can add efficiency to EFT and hastens your progress towards emotional freedom….especially when sandwiched between 2 trips through The Sequence.
One way to help memorize The Basic Recipe is to look at it as though it was a sandwich. The Setup is the preparation for the sandwich and the sandwich itself consists of two slices of bread (The Sequence) with the cheese, or middle portion, as the 9 Gamut Procedure. It looks like this…
The Sandwich
The Setup
The Sequence (Bread)
9 Gamut (Tofu)
The Sequence (Bread)
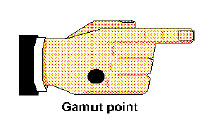

To do the 9 Gamut Procedure, you must first locate the Gamut point. It is on the back of either hand and is 1/2 inch behind the midpoint between the knuckles at the base of the ring finger and the little finger. If you draw an imaginary line between the knuckles at the base of the ring finger and little finger and consider that line to be the base of an equilateral triangle whose other sides converge to a point (apex) in the direction of the wrist, then the gamut point would be located at the apex of the triangle.
Next, you must perform 9 different actions while tapping the Gamut point continuously.
The 9 Gamut actions are:
1. Eyes closed.
2. Eyes open.
3. Eyes hard down right while holding the head steady.
4. Eyes hard down left while holding the head steady.
5. Roll eyes in a circle as though your nose was at the center of a clock and you were trying to see all the numbers in order.
6. Same as #5 only reverse the direction in which you roll your eyes.
7. Hum 2 seconds of a song (suggest Happy Birthday).
8. Count rapidly from 1 to 5.
9. Hum 2 seconds of a song again.
Note that these 9 actions are presented in a certain order and I suggest that you memorize them in the order given. However, you can mix the order up if you wish so long as you do all 9 of them…. and ….you perform 7, 8 and 9 as a unit.
That is, you hum 2 seconds of a song…then count…then hum the song again, in that order.
Years of experience have proven this to be important. Also, note that for some people humming Happy Birthday causes resistance because it brings up memories of unhappy birthdays. In this case, you can either use EFT on those unhappy memories and resolve them…or…you can side step this issue for now by having them hum some other song.
EFT – Step 4 The Sequence (again) and The Reminder Phrase
The fourth…and last…ingredient in The Basic Recipe was mentioned above. It is an identical trip through The Sequence. Once memorized, The Basic Recipe becomes a lifetime friend. It can be applied to an almost endless list of emotional and physical problems and provides relief from most of them. However, there’s one more concept we need to develop before we can apply The Basic Recipe to a given problem. It’s called the Reminder Phrase.
When a football quarterback throws a pass he aims it at a particular receiver. He doesn’t just throw the ball in the air and hope someone will catch it. Likewise, The Basic Recipe needs to be aimed at a specific problem. Otherwise, it will bounce around aimlessly with little or no effect.
You “aim” The Basic Recipe by applying it while “tuned in” to the problem from which you want relief. This tells your system which problem needs to be the receiver.
Remember the discovery statement which states… “The cause of all negative emotions is a disruption in the body’s energy system.”
Negative emotions come about because you are tuned into certain thoughts or circumstances which, in turn, cause your energy system to disrupt. Otherwise, you function normally. One’s fear of heights is not present, for example, while one is reading the comic section of the Sunday newspaper (and therefore not tuned in to the problem).
Tuning in to a problem can be done by simply thinking about it. In fact, tuning in means thinking about it. Thinking about the problem will bring about the energy disruptions involved which then….and only then….can be balanced by applying The Basic Recipe.
Without tuning in to the problem….thereby creating those energy disruptions….The Basic Recipe does nothing. Tuning in is seemingly a very simple process. You merely think about the problem while applying The Basic Recipe. That’s it….at least in theory.
However, you may find it a bit difficult to consciously think about the problem while you are tapping, humming, counting, etc. That’s why I’m introducing a Reminder Phrase that you can repeat continually while you are performing The Basic Recipe.
The Reminder Phrase is simply a word or short phrase that describes the problem and that you repeat out loud each time you tap one of the points in The Sequence. In this way you continually “remind” your system about the problem you are working on.
The best Reminder Phrase to use is usually identical to what you choose for the affirmation you use in The Setup. For example, if you are working on a fear of public speaking, The Setup affirmation would go like this….
Even though I have this fear of public speaking, I deeply and completely accept myself.
Within this affirmation, the underlined words….fear of public speaking….are ideal candidates for use as the Reminder Phrase.
You may notice that Adrienne and I sometimes use a bit shorter version of this Reminder Phrase when dealing with people on the tapes included with this course. We might, for example, use “public speaking fear” or just “public speaking” instead of the somewhat longer version above.
That’s just one of the shortcuts we have grown accustomed to after years of experience with these techniques. For your purposes, however, you can simplify your life by just using the identical words for the Reminder Phrase as you use for the affirmation in The Setup. That way you will minimize any possibility for error.
Now here’s an interesting point that you will most certainly notice on the audiotapes and some of the videos. When Adrienne and I are helping people with EFT we don’t always have them repeat a Reminder Phrase. That’s because we have discovered over time that simply stating the affirmation during The Setup is usually sufficient to “tune in” to the problem at hand. The subconscious mind usually locks on to the problem throughout The Basic Recipe even though all the tapping, humming, counting, etc. would seem to be distracting.
But this is not always true and, with our extensive training and experience, we are able to recognize whether or not using the Reminder Phrase is necessary. As stated, it is not usually necessary but…. when it is necessary it is really necessary and must be used .
What’s beautiful about EFT is that you don’t need to have our experience in this regard.
You don’t have to be able to figure out whether or not the Reminder Phrase is necessary. You can just assume it is always necessary and thereby assure yourself of always being tuned in to the problem by simply repeating the Reminder Phrase as instructed. It does no harm to repeat the Reminder Phrase when it is not necessary and will serve as an invaluable tool when it is.
This is part of the 100% overhaul concept mentioned earlier. We do many things in each round of The Basic Recipe that may not be necessary for a given problem. But when a particular part of The Basic Recipe is necessary… it is absolutely critical.
It does no harm to include everything…even what may be unnecessary…and it only takes 1minute per round. This includes always repeating the Reminder Phrase each time you tap a point during The Sequence. It costs nothing to include it….not even time….because it can be repeated within the same time it takes to tap each energy point 7 times.
This concept about the Reminder Phrase is an easy one. But just to be complete, I am including a few samples below:
**headache
**anger towards my father
**war memory
**stiffness in my neck
**nightmares
**craving for alcohol
**fear of snakes
**depression
Subsequent Round Adjustments
Let’s say you are using The Basic Recipe for some problem (fear, headache, anger, etc.).
Sometimes the problem will simply vanish after just one round while, at other times, one round provides only partial relief. When only partial relief is obtained, you will need to do one or more additional rounds.
Those subsequent rounds need to be adjusted slightly for best results. Here’s why: One of the main reasons why the first round doesn’t always completely eliminate a problem is because of the re-emergence of Psychological Reversal…that interfering blockage that
The Setup is designed to correct. This time, Psychological Reversal shows up in a somewhat different form. Instead of blocking your progress altogether it now blocks any remaining progress. You have already made some headway but become stopped part way toward complete relief because Psychological Reversal enters in a manner that keeps you from getting any better still.
Since the subconscious mind tends to be very literal, the subsequent rounds of The Basic Recipe need to address the fact that you are working on the remaining problem . Accordingly, the affirmation contained within The Setup needs to be adjusted as
does the Reminder Phrase. Here’s the adjusted format for The Setup affirmation:
Even though I still have some of this __________, I deeply and completely accept myself.
Please note the emphasized words ( still & some ) and how they change the thrust of the affirmation toward the remainder of the problem. It should be easy to make this adjustment and, after a little experience, you will fall into it quite naturally.Study the adjusted affirmations below. They reflect adjustments to the original affirmations shown earlier in this section.
**Even though I still have some of this fear of public speaking, I deeply and completely accept myself.
**Even though I still have some of this headache, I deeply and completely accept myself.
**Even though I still have some of this anger towards my father, I deeply and completely accept myself.
**Even though I still have some of this war memory, I deeply and completely accept myself.
**Even though I still have some of this stiffness in my neck, I deeply and completely accept myself.
**Even though I still have some of these nightmares, I deeply and completely accept myself.
**Even though I still have some of this craving for alcohol, I deeply and completely accept myself.
**Even though I still have some of this fear of snakes, I deeply and completely accept myself.
**Even though I still have some of this depression, I deeply and completely accept myself.
The Reminder Phrase is also easily adjusted. Just put the word remaining before the previously used phrase. Here, as examples, are adjusted versions of the previous Reminder Phrases.
**remaining headache
**remaining anger towards my father
**remaining war memory
**remaining stiffness in my neck
**remaining nightmares
**remaining craving for alcohol
**remaining fear of snakes
**remaining depression
This completes the features of The Basic Recipe. You now need two things to be effective with it. You need to memorize it and you need a few tips on how to apply it . Those tips are in next article.
Tips On How To Apply EFT
Source:
